CLICK HERE FOR FREE BLOGGER TEMPLATES, LINK BUTTONS AND MORE! »
Showing posts with label Imagine. Show all posts

Sunday, March 18, 2012

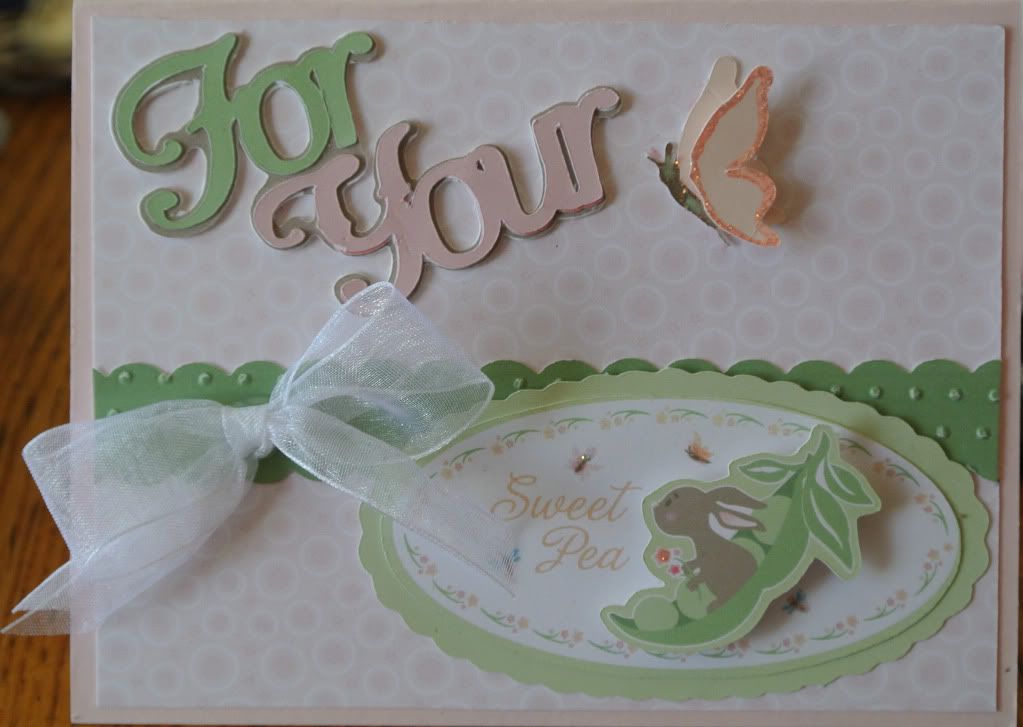
Sweet Pea baby card

This card was made with my Imagine & Cricut Craft Room.


The patterned paper,  Sweet Pea tag and all flood filled colors are from Nursery Tails. I flood-filled a 5.5 X 4.5 rectangle with the patterned image and then cut it down to 4 X 5. This was glued on to the front of a pink 4.5 x 5.5 card.

 The tag is cut at 2". To get the layering, I placed 2 of the tags on the mat. Using the edit feature, I separated them into layers. On one of the tags, I deleted the green oval and the bunny. After that I re-combined the remaining layers. The other tag I cut out all the pieces and discarded all but the bunny and green oval as for some reason I couldn't get the bunny to cut out right if I didn't. Glue the "sweet pea" oval on top of the green oval and attach bunny with a pop dot. I put a little bit of icicle stickles on the butterflies and center of the flowers.
 
"For Your" was done with the font from Elegant Cakes cut at 2". I welded the shadow and filled it with a brown . I also cut the shadow out of chipboard. "For" was filled with a green and ""Your" was filled with a pink . The shadow layer was glued onto the chipboard and the "For " and "Yours" on top of that.

For the single butterfly, I used Kates ABC's. It was cut at 1" I cut 1 body and 2 wings. The body was filled with brown and the wings with peach. I glued 1 wing on to the body and used a pop dot the attach the other. The wing on top was outlined with icicle stickles and I also put a little on the body.

The green strip is a shadows layer from Elegant edges. I took 2 images cut at .75 x 4.25, welded them together and filled it with green. I then ran it through my cuttlebug using swiss dots. It was cut to match the size of the patterned paper

For the bow I used a 1" white organza ribbon and used a glue gun to attach it.

If you would like the CCR file, click here

Sunday, March 4, 2012

It's been quite awhile...

since I've posted anything. I thought It's time post something new. I made this card for my grandson's 4th birthday yesterday.


I used Cricut Craft Room and my Imagine. Lightening McQueen is cut at 2 inches. I used Narelle's method again to print and cut all in one layer. There is no need to cut out the tire layers since they are black and the bottom layer is black. For the red, yellow, orange, white , and black I used the colors that are already built into CCR. The exhaust pipe is a gray from the JT cartridge. The inside of the wheel is a brown from Better Together. , I used RGB codes 164-177-207 for the windows , 115-150-201 for the eyes, and 163-57-4 for under the Rustees letters. Kachow is cut at 1" and the colors are the same as used on McQueen. I used the computer for "It's your Birthday" I used the Arial Bold font printed at 11pt. I mounted McQueen with 3D gluedots and my tape runner for the saying and Kachow.

Thursday, August 4, 2011

Snow White Book Bag


This bag was done for my granddaughter's friend for her birthday.

Cut and print Snow White2 from Happily Ever After at 7 inches using the method found on http://cricutcraftroomblog.blogspot.com/2011/07/printing-and-cutting-disney-layers-on.html on ink jet iron on fabric. Thanks to Narelle for discovering this. No more layering! The RGB codes used here are:

Black 17 27 22  (Best Friends black)
Skin 255 221 191
Lips and Bow 221 72 90 (Best Friends red)
Sleeves 179 201 238
Sleeve bands 251 223 139 ( Best Friends lt. yellow)
Bodice and Eyes  Blue that is on the color chart when you bring up the color wheel.

Iron on bag. Cut the word Snow White at 2 inches using Ashlynns Alphabet (cursive) that has been welded together and filled with black. Iron on bag. Using a small paint brush, brush on Art Institute fabric adhesive on to sleeves. Sprinkle with AI glitter Nirvana ultra fine transparent. Pat down glitter. Let sit for 5 minutes. Gently tap off glitter tapping on the back of the back. Lay bag on a foil lined cookie sheet.Put in an oven that was preheated to 300 and turned off. Leave in for 30 minutes. Brush off any remaining glitter.

Add rhinstones using the irock. I used blue.


Sunday, July 31, 2011

Belle Book Bag

     I made this for my grandaughter. The bag came from Oriental Trading. The bag was prewashed in cold water and line dried.  I used the Disney's "Dreams Come True" cartridge. Using my Imagine machine and inkjet iron on fabric I printed and cut the layers. I also used the Cricut Craftroom. 
      I made sure I used a brand new blade. The settings I used were pressure 4, speed 3 and blade depth 4.Belle's name is cut at 2 inches and filled in with black. Belle is cut at 7 inches. I used the shadow feature for the bottom layer and filled it with black. These are the RGB codes I used:

Skin - 254 226 203 (Stampin Up Blush Blossom)
Hair and eyes - 121 71 32
Gloves and shouldere - 255 228 120
Bodice - 255 223 74
Lips 242 116 137
(above from The Scrapmaster )

      Iron on each piece as you layer it. Follow the directions from your manufacturer. I used June Tailor Quick Fuse which I found at Joann's in the quilting area.
     After All layers are ironed down, use a small paint brush to apply Art Institute Fabric Adhesive to the gloves and shoulders. Sprinkle on Art Institute Jonquil ultra fine transparent glitter. Make sure all areas are covered. Using fingers, gently smash down glitter. Let sit for 5 minutes and then gently shake off excess glitter. Let dry 3-4 hour. Heat set by baking in an oven that has been preheated to 300 and then turned off. Place bag on a foil lined cookie sheet and bake for 30 minutes.
     Apply heat set rhinestones. Wash inside out in cold water and line dry


Wednesday, July 27, 2011

Ballerina Shirt


This shirt was made using inkjet iron on fabric, Cricut Imagine, Shall We Dance cartridge, and Art Institute glitter. This was also for my granddaughter's 6th birthday.